This page documents progress on a new hood for the Polaris RXL Sno-Pro Conversion Kit. The RXL kit fits IFS Indys from 1983 to 1993 with single headlight (not the wraparound light).
RXL report 6/14/26

The back surgery is over. I have strict instructions not to bend, lift or twist for at least six weeks to 3 months. This basically means I’m out of the RXL hood business for a time. I don’t want my prospective customers to wait any longer for an RXL kit. Therefor I am going to sell all the RXL molds to anyone who can successfully complete the project and start selling kits
What I’m selling are two sets of hood/nose molds and access to my suppliers who make the parts--fiberglass, graphics etc. (You don’t have to use them but I advise using the graphics gal to start.) I’m going to base the price on 10 kits--about $10,500. I have a waiting list of about 200 fellows but I’m sure most of them are so pissed at me for dragging my heels that they have gone on to other projects. I do know the RXL kit has many followers so you won’t be buying a dead horse. In addition, I will include my RXL mold for 120 Indy minis at no extra money.
I have only one proviso. I want your first hood to be in a special Polaris blue for I have for a Canadian, Rick Minke, to match the Mini RXL I built for his grandson. I have his part boxed and the special gelcoat.
I will not sell to just anyone with money. I’ll select someone with fiberglass experience and who has a good reputation. I will sign a no-compete on RXLs. I will need a day of your time to teach you what and how to do hoods. I will give you my complete suppliers list and do any/all post sales advice. I will be keeping my Indy sled to enjoy myself (it will not have an RXL hood.)
So contact me at 952-607-6063. I’ll be around night and evenings because I’m not going anywhere.
Thanks.
Phil Little
RXL report 5/19/26
This is an odd report. A long time ago I told you I had changed the nose pattern (male) so it kiss-fitted the hood. I also showed you the orange mold (female) made from that pattern by glass man 1.
Then I had a male part from the mold by glass man 2 and went dark--you didn’t hear from me.
Why? Because no way did it kiss fit the hood. I pondered that for a long while and had no answer. I took the male nose back to glass man 2 to see if the mold was wrong. It was a perfect match. Dead end.
Since glass man 1 is near to glass man 2 I had an empty van an drove over and picked up a van full of other molds I had to move from glass man 1.
In the pickup process at glass man 1, I spotted something that blew me away. I saw completely different molds for RXL nose and hood. I’d forgotten all about those molds (the result of being an old man).
New nose & hood molds
I brought back the nose mold which happily has a part in it.
Next week I’ll drive back and pick up the hood mold which also has a part in it. If God is smiling on me, these new parts can save my behind. The rework should be pretty simple.
Keep your fingers crossed so I don’t completely mess up this project more than I have.
RXL report 4/15/26

Best laid plans. RXL work stalled. Facing painful and restricting sciatica nerve impaired movement. Talk to back surgeon on Monday. Had something similar eleven years ago. Walked out of hospital an hour after surgery. Need a strong back for RXL completion. Sorry.
RXL report 3/13/26
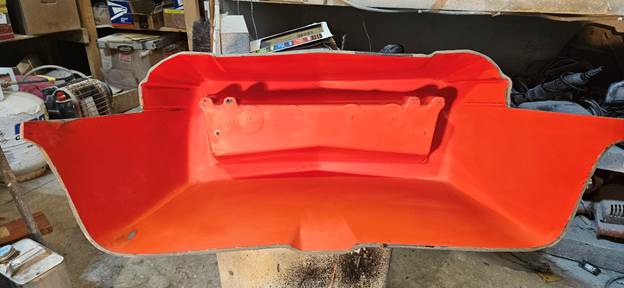
Well looky here, we got a finished RXL nose part from the mold. All that sanding and such paid off--it came out nice.
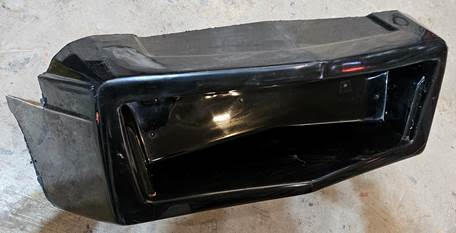
Okay, now begins the last phase: Match nose to hood gap, fix if needed, and begin work on hood--a bunch easier and faster than the nose took. I’ll show you the hood progress as it happens.
RXL report 2/18/26
A Milestone
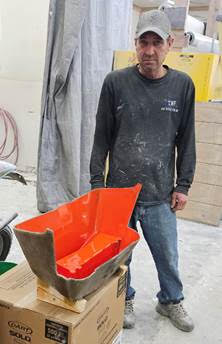
The RXL nose is now at the fiberglass shop after two decades of my work on it. Travis, my glass guy (glum because he doesn’t like his photo taken), is going to make a black part with which I test my nose/hood fit. Soon I’ll be sanding on the hood.
RXL report 2/4/26
Hurray, hurray sanding ended today. Nose mold interior is all sanded to 2000 grit. I’m done finally. Now it’s polishing and waxing. When it’s all shiny I’ll send you another photo for the last time. Within 7 working days I’ll start the hood and of course sent you more photos with my reports. Isn’t this fun? It’s like Show & Tell in kindergarten. Later.
RXL report 1/29/26
In another 4 to 5ish hours I will be done sanding and polishing the RXL nose mold. As I’ve said, once the nose mold is ready to make parts I will have one made which will be my test fitting mule. There is a nagging thought in my mind that I may not have a near perfect kiss fit between nose and hood. If I have to make tweaks, it will be on the hood side of the equation. I will send another photo of this mold all shiny and smooth, then poooff it’s gone to shop.
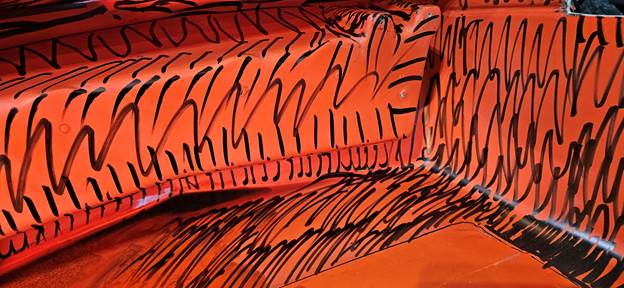
I’m sure some of you might have wondered about the magic marker scribbled about on the mold surface. That is my sanding coverage and depth gauge. To do this sanding exercise I started with 400 wet/dry. When the marker was gone I moved on to 800 grit, then 1000 grit. Currently I’m doing the last 2000 grit sanding before I polish the surface. 2000 works well to sand away scratches of preceding courser grits. After polishing, I wax and buff 5 times.
Getting’ close now.
RXL report 1/13/26
I think I’m about half way done prepping the nose mold. Lots of sanding and filling. I’m guessing the next time you hear from me I’ll be done.

On a happy note, I have found two new fiberglass suppliers. My old glass guy, who I love, told me he would be slow making my stuff since he just took on a huge new client--Winnebago I think. His plant is about 30 people strong and that is reflected in his prices. The new suppliers may offer lower prices because they have small three people shops. We’ll see. Until next time.
RXL report 12/23/25
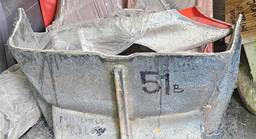
This is the RXL nose mold. Not a fiberglass man on the planet would do body work inside a mold. It is forbidden. In this case, since the pattern was destroyed pulling the mold, mold alterations are necessary. In the foreground, I am sanding in patches. The real issue is the grille inset (middle of the photo). Through my own ineptitude in making the pattern coupled with a guy at the glass house slopping molding gel in the mold to correct areas I have a mountain of sanding/polishing to do.

I know some of you have had it up to here with my lethargy and squandering time. I’d be pissed in your shoes too. My problem with slow timing is that business has slowed considerably. I have to scramble making money by working on parts that throw off quick money. This takes me away from the RXL project. I know some you noted my making a new Exciter hood recently but that fell into the quick money category. I’ll do my best to carve time away to work on the RXL. Realty is my only excuse. After the nose is turned into a workable mold, I’ll knock out the hood because that is two or three days of sanding/polishing. Until the next report.....
RXL report 12/6/25
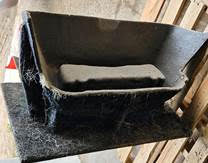
This is the nose mold I got back from glass shop. The ledge I built in for grille screen did not release and left Bondo in the mold. I discovered that with heat it easily comes out. That’s not an issue.


Residual Bondo | Bondo gone in three minutes
I have a sneaky suspicion that the gap between nose and hood wasn’t perfect. I was counting on the nose pattern surviving the mold process so I could do a final test. Sadly, the pattern was destroyed. I can’t do the final test until the first nose part is done. Another delay.
Once it comes back then I can do final prep on hood. So now I attack the nose with vigor.
XL report 11/22/25
This unexciting photo is the RXL nose mold. The exciting part is that it exists after all these months. It’s rather sad that the pattern part I made was destroyed in mold making. That in itself isn’t disappointing because patterns are always tossed out, but I’d hoped to install it on the sled to double check nose/hood tolerances. The wisest way to do that check is to use the first part that comes out of this mold.

I’ll finish the hood sanding/polishing as I rework this nose mold. At least you know that something is happening and that I’m not dead. More when I have it.
RXL report 10/8/25
Consider the nose history. It’s all sanded and polished. Thursday I take it 140 miles to my glass house for a mold. Next up--the hood.


RXL report 9/26/25
Got another day of sanding in. My hopes were to jump to 1000 grit. Nope, had to drop down to 800. I sprayed the nose with gray primer as my sanding guide (see gray on sides). Surprisingly my original 400 w/d sanding didn’t kill all the micro bumps but the 800 got ‘em. Only got the mouth and deck done. If you look close at the deck you’ll see magic marker loops. Those marked pits that I couldn’t sand away. Filled with gelcoat and will level at the next sanding.

RXL report 9/20/25
RXL nose in full gelcoat.

One day later after 7 hours of sanding with 400 wet/dry. I’m not fully done as you can see by my magic marker.

The next two bouts of sanding (with 1000 & 2000 grits) should be faster. After a last minute fit test it will go to the glass house for mold making. Then I tackle the hood.
RXL report 9/6/25
As I said last time, I’m working on the nose because it’s more difficult. The hood is comparitively easy, even though it will take an age. I’ve sanded the nose surface with 400 w/d. I’m doing something new--at least for me. I’m using gelcoat (red) as a primer to fill little imperfections. (My hope is to cut time by bypassing the primer stage.) Then I get to sand some more so everything comes out smoothly, followed by polishing. More when I have reportable news.

RXL report 8/23/25
I’ve started on the nose first. The gray surface is high build primer to fill the small pits in the auto filler beneath it. The black marks are magic marker, my sanding guide. When I sand down to the white gelcoat with 400 wet/dry, I know the surface is roughed up for the layer of new gelcoat I will spray over it.

This is the result of four hours of sanding and I am not finished with it yet. This hand block sanding process is what I call "surface sanding". I’m roughing the entire surface for a next layer of gelcoat. I will have sanded away any scratches and leveled the rough primer. This is the part I hate the most. Sanding is a thankless task but necessary for a good mold surface.

After I apply new gelcoat, I’ll have to sand it three more times. That’ll take days and I’m already months past my schedule. Happily, the hood is easier because it’s basically flat surfaces. Later.
RXL report 8/8/25
Got a lot done today. The nose/hood junction came out spectacularly. It looks like they are going to kiss. My old hood had a 1/8” gap. Never liked that.

Once the gap was finished, I started finishing the nose. The brown stuff (Bondo mixed with clear resin) is meant to cover cracks in the nose part which came out of the mold two years ago. Once the nose is ready I’ll coat it with a layer of colored gelcoat. That will be sanded/polished/waxed to be mold-ready. Then I’ll jump to the hood and do the same with it.


Guys, I’m now more than 50% done with the project (after sixteen years).
RXL report 7/26/25
Okay I’ve moved the hood forward to its right place. Now I’m closing the gap between hood and nose. Next is repositioning the hinges. After that we move into the “happy” phase, which is endless sanding/polishing to finish the pre-mold pattern. (I hate days of sanding but that’s where the final quality comes from.) Later.

RXL report 7/11/25
I’ve been dragging my heels because of GREED. Greed because I hafta spend time on parts I can produce and turn into money. Money for the last two years has been real tight. Now that we have a new government I suspect new buyers will appear. I have discovered what the problem was with the hood sitting too far to the rear. The problem was me. As I fittled making the hood and nose to kiss, I was slowly elongating the nose which forced the hood back:

Today I chopped the nose back which largely worked. Here you can see a 3/8" gap I cut out of the nose:

That also meant chopping the area around the hinges:

Once I fettle the gap and reseat the hinges, I am off to the last stage which is sanding and polishing hood and nose. Then I turn over to the glass house to make the mold. How long, you ask? Fiddling will be a week. Sanding should be two more weeks. I will surely share with you that glorious date when it goes to glass house and I’ll give more updates because my paying work is slowing down.
Report 5/9/25
Oh boy.
I finished matching nose and hood joint pretty well. All along, I’ve been watching how the hood sticks out past the rear of the aluminum bumper (fuzzy photo) and hoped my work up front would cure that. It didn’t.


My choices now are three.
- Look for something on hood bottom edge causing an impediment
- Work the nose/hood joint some more, but I’m not going to move the hood forward by ½"
- Cut the hinge cavities out of the hood and cut ½" from hood front to move it forward. This scares me because now the side joints may be out of whack. Then I’d have to reinstall hinge cavities perfectly.
I didn’t need this because I was getting close. I’ll tell you how this all goes.
Report 5/2/25
I’m still in the process of blending the lines between the nose and hood. It’s a slow process of adding material and sanding it down. Then I go back and mount the parts on a chassis and make new notes for more changes. Grinds up time. Can’t wait until I start finish sanding the pre mold pattern (plug).


P.S. I hate sanding but it’s the only way to produce the best possible finish on the final parts.
Report 4/6/25
Hinges are pretty much in place. I have to futz a bit more with the hood and it will be ready for the great sanding job.

Two steps back. While I had the hood kinda ready I started making the trimming guide. It is now done and allows the glass people to know where to trim out the holes and the great cutaway for sleds with the wider new seats.


Report 4/1/25
Last time I showed the hinge pockets attached to hood.

This is the underside sealing of the pocket.

Now I’ve glassed the pockets to the underside.

I closed the front hood edge to eliminate any weakness at the hood/nose joint.

Top side of hood with finished edge and blended pockets.

After I complete the nose then the long sanding process will begin.
Report 3/25/25
I think I finally got it! You are looking at the RXL hood and nose with duct tape and brown Bondo slurped around in a mess. To me, it’s a watershed moment of perfect order.


The hidden hinge issue has been kicking my butt. Today I got all the alignments keyed in. The brown stuff is really a serious autobody filler with fiberglass strands for strength. You can see the aluminum hinge on the right. It’s glued to the hood. In a future photo I’ll show you the filler ground down so you can see what’s really going on. If I’m right, this is the moment that separates the before with the after. At this point it’s downhill. Which means a lot of sanding.
My plan is that all you’ll see of the hinge is the bottom part (with blocks and a bit of orange). The upper part of the hinge with the recessed hole will be flush with the hood. This part will be hidden by the hood graphics. Oh happy day.
My reports will be happening more frequently now because the process will speed up. Hang in there, dudes.
Report 2/21/25
This photo of these mesh grill mounts may not look like a big deal but I’ve been working on them for some time. The shape has to just right or the nose won’t pull from the mold.

Here they are mounted in the nose.

Report 2/14/25
I received a call from one of you asking “how is it going?” This is my bad. My intent was to report significant progress. I will from now on report anything that is movement. The more often I report, the more comfortable you will be. One, you will know I’m still alive (Hey Tom, you know that dude is 83 and could topple over at any time.) And two, you’ll see action that may be of interest.


These three shots show how I’m finishing the nose to close the gap between it and the hood.


Here are the stepped pieces in the nose sides, which will become the grill-screen mounts. No longer will you have to fumble with little angle brackets to mount the screen. Two small screws on both sides will be simple for mounting.
When the temperature in my pole barn reaches 20o above zero, I can return to the hinge mounting work. When nose and hinges are complete, then it’s the long process of sanding and polishing the hood and nose parts prior to a new mold. When you see that stage, it will be the end of the process and production will begin. When parts start coming out of the molds, I will drop motorcycle production and spend all my time to shipping RXL kits.
Speaking of shipping, much has changed. Greyhound Express was shut down. It was wonderfully cheap. Now we have to deal with the costs of UPS etc. If you live in ND, SD, MN, NB, IA, WI, IL and the Ironwood tip of MI’s U.P. you are served by Speedee and they are reasonable (under $200 I think). To ship to other parts of the US snowbelt, we’ll have to rely on private snowmobile & motorcycle shippers. We’re covered in Saskatchewan and Manitoba because I have a cheap way of getting them across the border. If you live in other provinces I’ll have to ship to collection points on this side and you’ll have to drive across do a pickup and return to Canada.
"Progress" Report 10/24/22
RXL Setback
I happily got my new hinges on 8/10/22. When I pulled the project out this weekend to restudy the problem of the hinge pivot location vis-vi the nose, I have a gap of .555.” I realized there was no cheap way to re-engineer the hinge. The pivot point has to be right on the division line of the hood and nose.


My real only option is to adjust the length of the nose and shorten the hood, which I have started.

Your question is when will it be done. The answer is I don’t know. This involvement won’t be done fast because I work it in with all my other product projects. Sorry for the delay but I’m giving you the truth even if it isn’t happy.
Report 8/2/22
 That feller is Tom Dousette. He is the guy I go to for specially made parts. This weekend I took him my sled, hood, nose and lift. I have challenged him to develop my RXL hinges. At first blush, it doesn’t look like an easy project. There are issues of having the front hood edge having lift up and forward over the nose. It may come that I wouldn’t be able to have invisible hinges because the pivot point has to be where nose and hood meet. We all are going to have another issue. As the hood rises, it will probably contact the handle bars. So we all have to get used to maneuvering the hood rear around scratch-able contacts. I will have a procedure and an Indian chant to get this done cleanly. More info when I have it.
Phil
Report 11/1/21
 The process of developing a hidden hinge system for the new RXL hood is going to be more complicated than I thought. Above is a customer’s sled. You’ll see he put hinges on his just Indy inside of the surrounding red stripe. I want my hinges hidden under the red stripe. The Polaris aluminum support for the old hinge system is narrower than will be my support. My system has to allow for this disparity. When I’ve solved this issue I will report back.
Report 12/21/20
 The old mold that made 200+ RXL SnoPro hoods was exhausted. Fiberglass molds don’t last forever. Its viability was compromised by past suppliers who botched the surface with repairs. The last parts from that mold had to reworked and polished. The time it took ground away at profitability.
Now because there are so many of you wanting RXL SnoPro hoods for Indys, I feel it’s time to layout my plans.
Here’s my timing:
- I have to order a new hood and nose which become the “pattern” part. Money is tight now with COVID.
- I have to alter the hood with my changes-a hinge opening, corrections to mating lines of nose and hood. I have no viable place to work on this this pattern. The heated part of my shop is very small therefor I want to avoid the mountains of dust which will result. I have to wait for warmer weather so I can work outside my shop door.
- I have to pony up the funds to make a new mold--about $1200.
Then I’ll have hoods to sell.
When I start, I promise to send you periodic updates so you can get a clue when they will be done. Right about that time, I will be asking you to give me a commitment to purchase so I can alert all my suppliers. The date of the orders I get from you when I say “go” will be the order in which they will be issued.
Thanks. Phil